Fixed – Windows Cannot Be Installed To This Disk
Trying to install Windows on your PC and running into Windows cannot be installed to this disk error? Well, you aren’t alone. Many users have faced this issue when installing Windows for the first time or re-installing Windows. The error that you will most likely encounter is “Windows cannot be installed to this disk. The selected disk is of the GPT partition style” or “Windows Cannot Be Installed To This Disk. The Selected Disk Has an MBR Partition Table”. Those who are beginners will have no clue about what in the world GPT is and what it means when it comes to partition styles. So before we dive into solutions for “Windows cannot be installed to this disk. The selected disk is of the GPT partition style”, it’s worth spending some time understanding what GPT and MBR is all about.

GPT and MBR Partition Style? What’s that?
GPT stands for GUID Partition Tablee. Basically, whenever you are setting up a new disk on Windows 8.x or Windows 10, you will be asked whether you want to use GPT or MBR (Master Boot Record). GPT and MBR are different ways of storing the partitioning information on a drive. The partitioning information includes details such as where partitions start, which is needed for Windows OS to recognize which sector belongs to each partition and which of those is bootable.
MBR is called Master Boot Record because it’s a special boot sector that’s located at the beginning of a drive and contains the boot loader for the installed OS, in this case, Windows. MBR works fine up to 2TB in size but fails when there is more than 2TB space. Another limitation of MBR is that it only supports four primary partitions.
GPT is gradually replacing MBR and is becoming the new standard. GPT is called GUID Partition Table because every partition on the drive has what’s called Globally Unique Identifier – GUID for short. GPT is a modern partitioning system and doesn’t suffer from the limitations of MBR. With GPT, you can have larger drives and unlimited amount of partitions, limited only by OS capability. Windows currently allows up to 128 partitions on a GPT drive.
The next time Windows flashes the annoying “Windows cannot be installed to this disk. The selected disk is of the GPT partition style”, you can actually relate to what GPT partition style is all about! Now that we understand the clear distinction between GPT and MBR partition styles, let’s get to solving the problem at hand – how to fix “Windows cannot be installed to this disk” error.
How to Fix “Windows Cannot Be Installed to This Disk”
You will likely come across one of these error messages when installing Windows –
Error Message 1: Windows Cannot Be Installed To This Disk. The Selected Disk Is of GPT Partition Style
Error Message 2: Windows Cannot Be Installed To This Disk. The Selected Disk Has an MBR Partition Table
We present solutions to both these commonly encountered error messages. Let’s first take a look at how we can resolve GPT partition style error.
How to fix “Windows Cannot Be Installed To This Disk. The Selected Disk Is of GPT Partition Style”
One of the primary reasons Windows flashes this error message is because the motherboard you are using supports only Legacy BIOS, instead of Legacy + UEFI/CSM Boot. In Legacy BIOS, a user can install Windows only on an MBR disk partition. Because traditional/legacy BIOS cannot recognize the new, modern GPT partition style. However, the GPT partition style disk can still be read and written to, because Windows supports it. The problem comes only during the OS installation. Don’t worry! There are ways to fix “Windows Cannot Be Installed To This Disk. The Selected Disk Is of GPT Partition Style”.
To get rid of this error, you will need to convert GPT to MBR. This can be down in two ways. We will present both methods here.
Convert GPT To MBR
Note: The methods outlined below will cause data loss. Be sure to take backup of all the data you need before converting GPT to MBR.
Method 1: Use Diskpart
Note: This method requires some basic knowledge about command prompt usage. Proceed with caution.
- When you see the error during Windows installation, press Shift + F10 to bring up Command Prompt. If Command Prompt doesn’t appear, you may want to go back to the first install Windows screen and then press Shift + F10 to launch Command Prompt.
- In the command prompt type: diskpart
- Hit Enter. Then type: list disk
- Hit Enter. Then type: select disk 1
- Here 1 signifies the number of GPT disks
- Hit enter. Then type: clean
- Hit enter. type: convert mbr
You should see a message “DiskPart successfully converted selected disk to MBR format”. You can exit the command prompt by typing exit. Now continue to install Windows and it should get installed without any issues.
Method 2: Using Disk Management Utility
This method works only if you have another Windows OS on the same computer. You can use Disk Management Utility that comes in-built with Windows OS to convert GPT to MBR. Follow these steps –
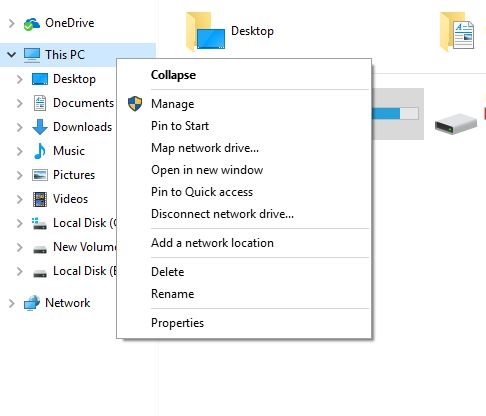
- When on working Windows OS, right-click This PC (Windows 10) or My Computer (earlier versions of Windows) and select Manage -> Disk Management.

- Delete all partitions or volumes on GPT disk using right-click -> Delete Volume.
- Now right click on GPT disk and choose “Convert to MBR Disk“.
Once converted to MBR, you can proceed with Windows installation.
Now, let’s take a look at the other error message type: “Windows Cannot Be Installed To This Disk. The Selected Disk Has an MBR Partition Table”
How to fix “Windows Cannot Be Installed To This Disk. The Selected Disk Has an MBR Partition Table”
This error message can be fixed by converting MBR to GPT, the exact opposite of what we did in the earlier section. It’s always a good idea to take a backup of all the data you need before converting MBR to GPT. We will present two ways of converting MBR to GPT.
Convert MBR to GPT
Method 1: Using diskpart
- Bring up the command prompt. In the command prompt type: diskpart
- Hit Enter. Then type: list disk
- Hit Enter. Then type: select disk 1
- Here 1 signifies the number of GPT disks
- Hit enter. Then type: clean
- Hit enter. type: convert gpt
Method 2: Using AOMEI Partition Assistant
AOMEI Partition Assistant lets you convert MBR to GPT without data loss. But the free version doesn’t allow you to convert MBR to GPT. If you aren’t comfortable with command prompt, you may have to purchase the tool to convert MBR to GPT. Once you have the tool, follow these simple steps to convert MBR to GPT –
- Start the tool. Select the disk to convert.
- Right-click and select “Convert to GPT/MBR disk”
- Confirm the operation and click “OK”. Then click “Apply” to complete the changes.
We have covered the solutions for “Windows Cannot Be Installed To This Disk. The Selected Disk Is of GPT Partition Style” and “Windows Cannot Be Installed To This Disk. The Selected Disk Has an MBR Partition Table”. Sometimes, you have also seen this error: “Windows cannot be installed on dynamic disk“. Although encountered less frequently, it’s good to know how to get around this error. Let’s also take a look at how to fix “Windows cannot be installed on dynamic disk” error.
How to fix “Windows cannot be installed on dynamic disk” Error
Note: As always, take a backup of all the data you need before converting dynamic disk to basic disk.
The best way to fix this error is to convert dynamic disk to basic disk using diskpart. Follow these simple steps –
- Start command prompt and type: diskpart
- Hit Enter. Then type: list disk
- Hit Enter. Then type: select disk N. Here ‘N’ should be replaced by the number corresponding to dynamic disk.
- Hit Enter. Then type: detail disk
- Hit Enter. Then type: select volume=0
- Hit Enter. Then type: delete volume
- Hit Enter. Then type: select volume=1
- Hit Enter. Then type: delete volume
- Once all the volumes in dynamic disks are deleted, type: convert basic
You should see the message “DiskPart successfully converted selected disks to basic format”. Then type ‘exit‘ to come out of command prompt and proceed with the installation.
More on Windows
- Fix ‘this copy of windows is not genuine‘
- Fix ‘the drive where windows is installed is locked‘
- Fix ‘Windows was unable to complete the format‘
That’s it, folks! Hope this article helps you to get around the annoying Windows Cannot Be Installed To This Disk error. Do let us know if you faced other issues while following the methods and the steps outlined in this post. We’d love to hear from you!
The post Fixed – Windows Cannot Be Installed To This Disk appeared first on MobiPicker.
(58)

