This next-level Google Calendar hack lets you focus on what matters
Not long ago, I experienced an “aha!” moment with my Google Calendar agenda organization.
My life and the events around it, I realized, were essentially split into several different and distinct segments. I have work-related meetings and deadlines, of course, but then I also have personal appointments—doctor visits, haircuts, and other such exciting endeavors—along with family matters, travel-related items, and a perpetually overstocked smorgasbord of reminders (which I collect in that same space and then sync to my inbox for good measure).
So here’s the revelation: When I’m thinking about one of those life segments, I almost never want to be bothered by any of the other areas. If I’m looking at work-related deadlines, for instance, it’s counterproductive to see my next eye exam or my kids’ gymnastics class crammed into that same view. And if I’m trying to schedule a haircut, I don’t need to see every work-related reminder. The superfluous stuff clutters my calendar, which makes it tough to focus on what matters at any given moment.
Once I tapped into that realization, I wanted to come up with a better system. And I’m happy to report that it’s actually quite simple to split up your Google Calendar events in a way that reflects the messy, multifaceted nature of your life and makes it possible to focus only on the items relevant to you at any particular point in time.
Here’s how.
Create your Calendar segments
The first step to stepping up your Google Calendar organization is to think about what specific segments make the most sense for your life. It isn’t difficult to do; just look at your agenda and see what sorts of events dominate the list.
For me, most events fell into one of the following categories: work deadlines, work meetings, personal appointments, family appointments, work reminders, personal reminders, travel-related plans, and occasions to remember (birthdays, anniversaries, pie-eating Thursdays, and so on). So those are the segments I created.
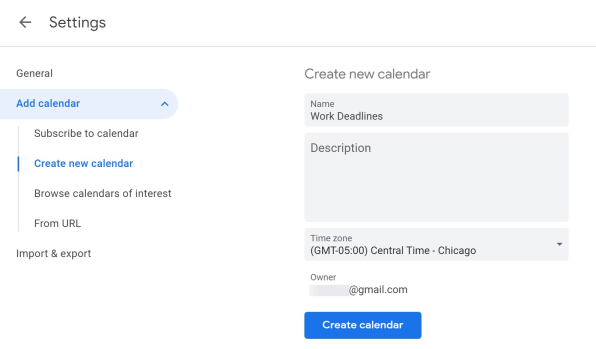
For every category you encounter—and decide to separate out into its own filter-ready segment—do the following:

One thing worth thinking about: Whatever type of event you create most often should probably become your default calendar instead of being split into its own newly created segment. That way, your existing events will already be assigned to it—and any new events will land in it by default. All you have to do is find your current default calendar in the “My calendars” list to the left of the main Calendar site (it usually has your name as its title, unless you changed it at some point), then hover over it, click the three-dot menu icon that appears, select “Settings and sharing,” and rename it appropriately.
And with that, you’ve officially got calendar segments for all your important life areas. Next, let’s optimize them all for maximum efficiency.
Optimize and customize
Aside from allowing you to filter your calendar events in a sensible way, the beauty of this upgraded Google Calendar setup is how it empowers you to set different default behaviors for every type of event in your life.
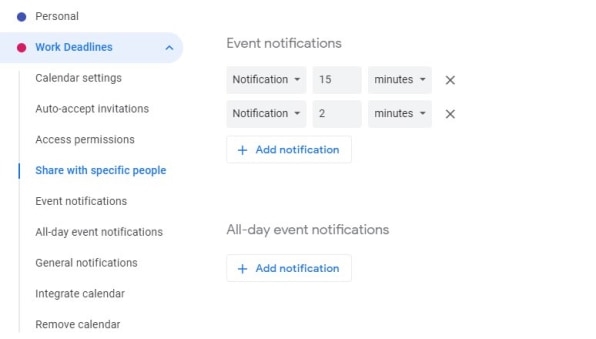
Now that your segments are created, go back into Calendar’s settings and find each new calendar you created under the “Settings for my calendars” section on the left side of the screen. One by one, click each calendar’s name, then scroll down the main section of the page until you see the header labeled “Event notifications.”
And here comes the fun part: Think carefully about how you’d most often prefer to be notified for events of each specific type. For instance, I generally don’t want any notifications for my work-related deadlines, since I already tend to be thinking about those far in advance of their due dates. For work-related meetings (which are usually phone- or video-based for me), I like to get a heads-up 15 minutes ahead of time and then another alert a minute or two before they begin. For family occasions, it’s helpful for me to be notified a few days beforehand so I have the opportunity to scramble and find a last-minute gift (shh…it’s our little secret).

Once you’ve set up the custom defaults for each of your event types, your preferred notification arrangement will pop up automatically whenever you assign an event to a category. Handy, no?
One last little customization step to take: On the main Calendar website (back out of the settings section), find each calendar you created in the “My calendars” sidebar on the left side of the screen. Hover your mouse over each one and click the three-line menu icon that appears, then choose a color from the series of selections (or click the small plus icon beneath all the colors to assign your own custom hue). That’ll give events from each segment their own consistent color on your calendar, without any ongoing effort on your behalf.
All that’s left now is to get your existing events in order and start taking advantage of your newly enhanced setup.
Organize and focus
The easiest way to organize your existing events is to head into Calendar’s Agenda view, either by using the selector tool in the upper-right area of the screen or by hitting the keyboard shortcut “A” from the main Calendar site.
This part’s slightly tedious, but you’ll only have to do it once: Look through every upcoming event in your list and think about which segment it should be associated with. If it needs to be assigned to any segment other than your default calendar, double-click it and change the setting. And from here on out, just be sure to assign every event to the correct segment as you’re creating it.
Last but not least, start filtering your segments and making your calendar more effective. On the desktop Calendar site, click the box next to any calendar in the “My calendars” section at the left to show or hide it from your active view (regardless of whether you’re looking at the Agenda view, the Month view, or any other arrangement). You can also hover over any calendar and click its three-dot menu icon to find an option for isolating that specific segment and showing only its events while hiding all others.
Similar options are available in the Calendar mobile apps as well: On either Android or iOS, just tap the three-line menu icon in the upper-left corner of the screen, then check or uncheck the boxes next to any of your calendars to show or hide their events.
Enjoy your upgraded agenda.
For even more next-level Google knowledge, check out my Android Intelligence newsletter.
(28)


